 The scale of coolrooms varies significantly, ranging from vast commercial freezers to small, modular facilities like labs, pharmacies, and bakeries. In fact, the introduction of modular assembly panels makes it easy for users to install with little professional help. Here’s a guide to help you through the coolroom installation process:
Tools Required:
• Silicone
• Mastic
• Cam lock
• Gloves
Choosing the Ideal Location for the Installation Process
Located away from Sunlight.
The room should be set up in tight spaces where there is minimal movement and flow of air. As such, the refrigeration unit should not be installed in direct sunlight, and the ambient temperature around the unit should not exceed 43 degrees Celsius.
Adequate Space
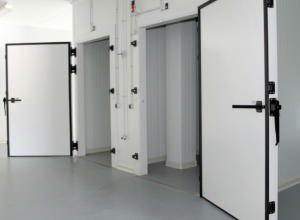
 Also, you should leave enough space close to the entrance to allow the door to open and shut correctly. Swing doors, for example, require adequate space for them to operate unobstructed as they come aligned and tensioned.
Leveled Surface
The unit should also be erected on a flat surface to prevent panel misalignment and let the door to close correctly. An allowance of 5mm may be allowed on each end of the floor.
Coolrooms are erected for various reasons. The discussion highlights cold room installation process for three different floor plans:
Installing on Existing Concrete without Insulation
In this case, you begin by measuring the dimensions of the room and marking them out. If the floor plan has a square shape, the difference in diagonals from one corner to another should not go beyond 3mm. Be sure to leave an allowance of 25mm from the walls in case of errors.
Proceed to cut the aluminum base “F” mold into a square to fit the doorways and mitre the corners. Then, apply a strip of polythene, which should be 300mm wide along using 10mm resin to the concrete floor on the borders of the room or planned construction area. Also, apply the resin underneath the aluminum “F” base and fix it to the concrete using tappets (400 mm). Ensure the aluminum mold remains straight along the discontinued edges to allow a continuous alignment. Proceed to install the wall as highlighted later in the discussion.
Installing a Coolroom on an Insulated Concrete Floor
Here, you should start by setting out the 300mm-wide strip of polythene on the concrete floor. Be sure to apply it on the inside of the aluminum base and the edges. Then, lay out the polythene strip on top of the mastic bead while attaching it to the aluminum mold and concrete. Proceed to erect the wall section.
Installing the Coolroom on a Prefabricated Floor that has Wall Panels
 If the floor extends to more than one section of the area, the matching panels should be placed close. Be sure to locate the marked out areas of the panel to help you align them correctly. Then, fit the adjacent panels using the 10 mm resin that is applied on the lower side of the slip-joint. Proceed to lay the ply sheet over the floor, beginning with the 600 mm strip located at the end of the floor area.
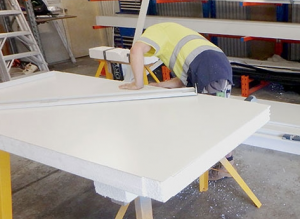
The plied sheet can be 12mm or more. Use the edge as the reference wall to cover the whole floor. Then, place an aluminum tread plate over the ply sheet. Keep in mind to stagger the joints to avoid creating straight joint lines on the floor while setting up a sturdier surface that holds up better under normal circumstances. Use silicone to seal the joints between the adjacent tread plate sheets. Proceed to lay out the aluminum base mold and follow it up with the wall erection.
Installing the Wall
The supplied plan may help you set up different wall and ceiling panels. If you are setting up the coolroom in a large room, you may need some roof hangars to help support the large ceiling parts. Here are steps to help you set up the wall:
Start by fitting the corner wall panel on the back wall. Then, use fast-fit inserts to fit the first piece of the panel and follow it up with a second one to form a right angle.
Proceed to fit the side walls, working from the back towards the front of the cold room. Fit the ceiling support brackets to the edges of the panel. Then, lift the ceiling panels and hang them using the support brackets and fasten them. Proceed to erect the front of the room, beginning with the door panel that makes up a corner.
Find out more about our coolroom installation services in Perth WA www.centralwestrefrigeration.com.au/coolrooms/